What to Do if Your PC Won’t Enter Sleep Mode

If your PC won’t sleep, you’re not alone—this is a common issue that many users experience, especially with Windows 10 showing signs of aging. For those unfamiliar, Sleep mode is a very useful feature for both laptop and desktop users. It allows the computer to enter a low-power state without completely shutting down, making it easy to resume work right away without waiting for the system to boot up again.
Reasons Why Your Windows 10 PC Won’t Sleep
Have you ever wondered why your PC won’t go to sleep? For many users, the cause lies in outdated system drivers. Drivers need regular updates to remain compatible with the latest software and features, and outdated ones can interfere with functions like Sleep mode. However, there are other factors that can prevent your computer from sleeping:
- Faulty power settings
- Issues with the latest updates or builds
- Screensaver errors
- System malfunctions
- Conflicting software or applications
In any case, problems with sleep mode can arise for several reasons, but the good news is they can usually be resolved easily. Let’s explore some solutions that might help you fix the issue.
How to Fix Sleep Mode Issues in Windows 10
Solution 1: Run the Power Troubleshooter
Windows 10 includes a built-in Power Troubleshooter, which can help identify and resolve issues with sleep mode. Here’s how to run it:
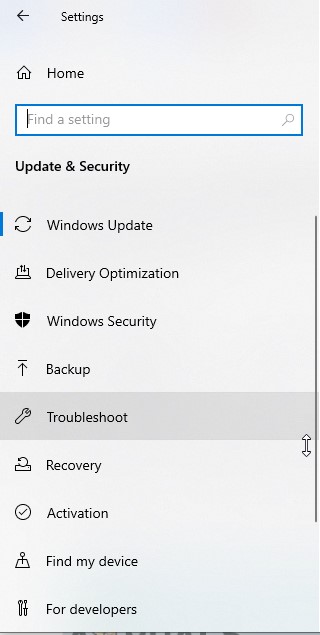
- Open System Settings on your PC. You can do this by using the start menu or pressing Win + I.
- Go to Update & Security, and select Troubleshoot from the left panel.
- Click on Additional Troubleshooters.
- Find and select Power, then click on Run the troubleshooter.

Once the troubleshooter starts, follow the on-screen instructions. After the process finishes, restart your computer and check if the issue is resolved.
Solution 2: Adjust Advanced Power Settings
Your PC’s power settings can significantly impact its performance, including how well it enters Sleep mode. If these settings are not configured correctly, the computer may struggle to enter Sleep mode. Here’s what you need to do:
- Open System Settings and go to the System option.
- Scroll down and select Power & Sleep from the left pane.
- Click on Additional Power Settings under the Related Settings section.
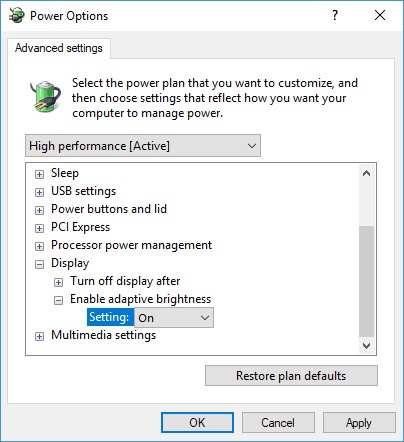
- In the next window, click on Change Plan Settings.
- Then, select Change Advanced Power Settings.
- In the new pop-up, expand Multimedia Settings, then open When Sharing Media and change the power setting to Allow the computer to sleep (instead of Prevent idling to sleep).
Save the changes and restart your PC. This should help your system manage power settings more effectively. If the problem persists, don’t worry—there are more fixes to try!
Solution 3: Disable Hybrid Sleep
Hybrid Sleep can sometimes interfere with the Sleep process, and turning it off may help resolve the issue. To disable Hybrid Sleep:
- Open System Settings and navigate to Power & Sleep.
- Click on Additional Power Settings.
- Click on Change Plan Settings under your selected plan.
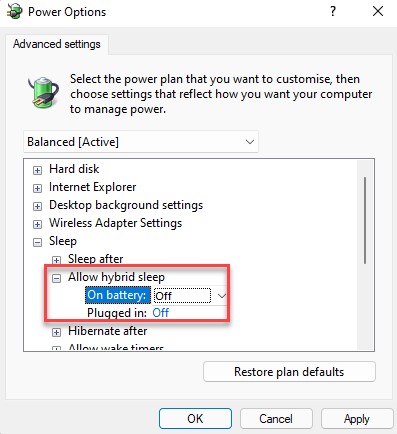
- Select Change Advanced Power Settings.
- In the new menu, expand Sleep and then expand Allow Hybrid Sleep, and set it to Off.
Disabling Hybrid Sleep ensures that your PC will go into a normal Sleep mode without interference. Also, double-check that the sleep timers in the power settings are set to a reasonable amount of time.
Solution 4: Disable Wake Timers
Wake Timers are programs that can prevent your PC from sleeping by waking it up for scheduled tasks. If these are enabled, they can cause your computer to stay awake. To disable Wake Timers:
- Open System Settings and go to Power & Sleep.
- Click on Additional Power Settings.
- Select Change Plan Settings under your active power plan.
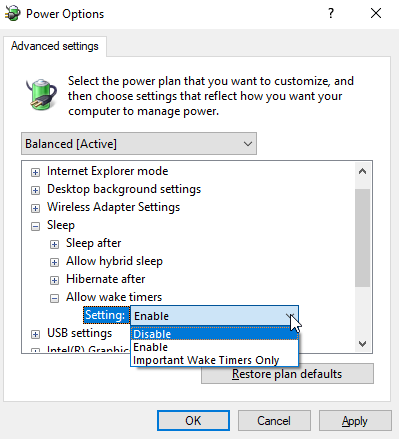
- Click on Change Advanced Power Settings.
- In the pop-up, find the Wake Timers option and set it to Disable.
By turning off Wake Timers, you prevent unnecessary wake-ups and allow your PC to sleep when it’s supposed to.
Solution 5: Manually Resolve Interfering Processes
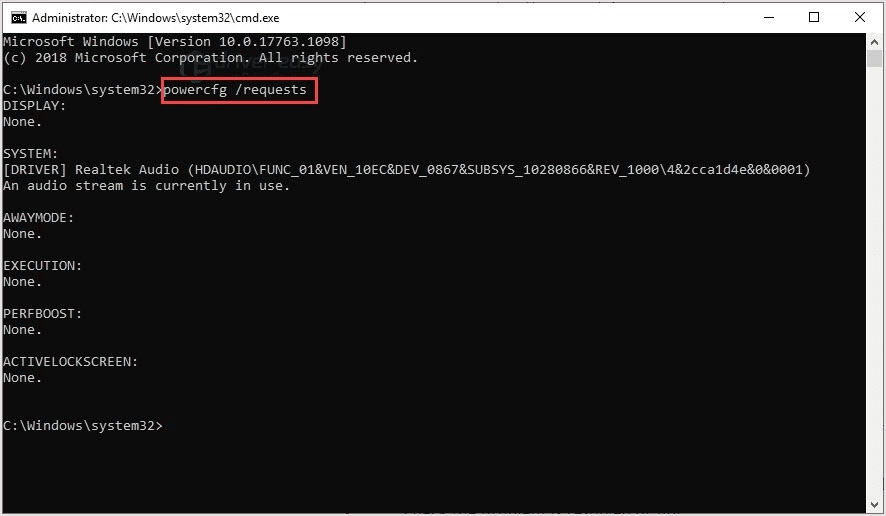
After disabling wake timers, the next step is to check if any processes are interfering with your PC’s ability to sleep. You can easily identify these processes using the Command Prompt. Here’s how:
- Open Command Prompt as an administrator.
- Type the following command:
powercfg /requests
(Make sure to leave a space after “powercfg” and before “/requests.”)
If the command reveals any processes preventing your PC from entering Sleep mode, manually locate the problematic application and disable it.
If none of these solutions work, you might want to try resetting your PC or restoring it to a previous state when Sleep mode was functioning properly. Sometimes, glitches in certain applications can disrupt normal operations, and the easiest way to address this is by updating your operating system and drivers to the latest versions.